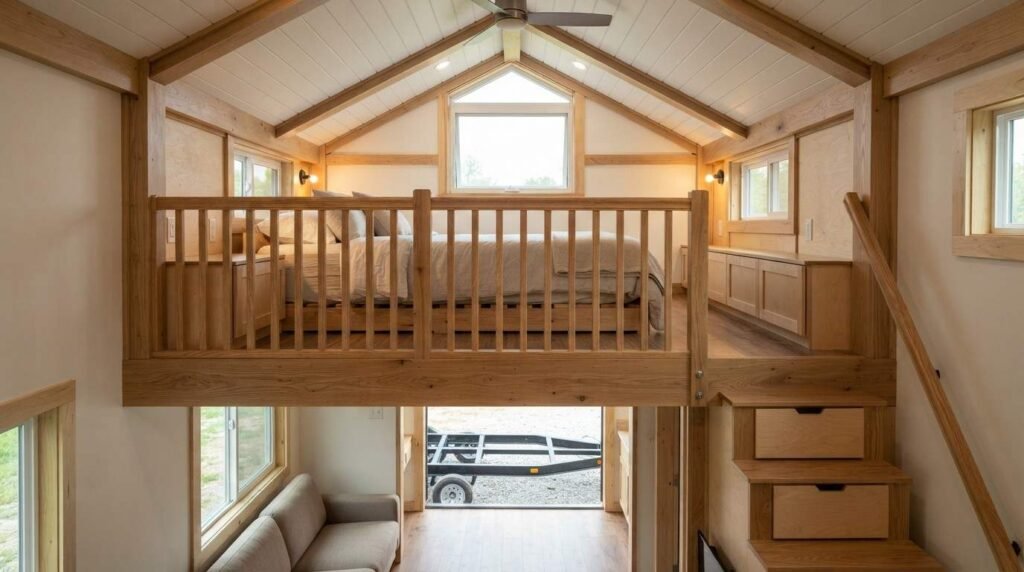
A sleeping loft is an elevated sleeping platform built into the upper volume of a tiny home, framed above the main floor and accessed by stairs or a ladder. I treat it as the single hardest space in any tiny home to get right, because comfort, structure, and life safety all collide there.
Loft mistakes are expensive and permanent. I have seen buyers discover the headroom problem, the ladder problem, and the egress problem only after moving in, when nothing can be changed cheaply.
This guide covers loft definitions, headroom, framing loads, access systems, guardrails, egress, ventilation, insulation, electrical, California code, builder evaluation, cost, and the mistakes I see most.
What Is a Sleeping Loft in a Tiny Home?
A sleeping loft is a partial upper floor that sits above the main living level and holds a bed, bedding, and usually some storage. It borrows vertical volume instead of floor area, which is why it appears in almost every tiny home under 400 square feet.
I think of the loft as a structural element first and a bedroom second. That order matters, because the framing decisions get locked in long before anyone picks a mattress.
The International Code Council’s Appendix AQ provisions define a loft as a floor level above the main floor, open to that floor, used as a sleeping or living space. California adopted that framework, which gives us a real reference point instead of guesswork.
How Sleeping Lofts Differ From Standard Bedrooms
A standard bedroom gives you full standing height, a door, a window at walking level, and a wall-framed floor system designed only for gravity loads. A loft gives you none of that automatically.
The differences show up in three places: headroom, access, and egress. Every one of those becomes a design constraint rather than a default.
I also treat loft privacy differently. Curtains, half walls, and sliding panels replace doors, so acoustic and visual separation get designed rather than assumed.
Common Loft Configurations in California Tiny Homes
Most builds I work on use one of four layouts. A single full-width loft over one end, twin lofts at both ends, a loft over a bathroom and kitchen block, or a partial loft paired with a main-floor bed.
Twin lofts work well for families, since each loft handles a different sleeping group. A single deep loft suits couples who want a queen mattress plus storage along the knee wall.
The layout drives everything downstream. Stair position, window placement, mini-split location, and even trailer weight distribution all follow from that one decision.
Why Loft Design Quality Signals Builder Craftsmanship
I use the loft as my fastest read on a builder. It exposes framing skill, code literacy, finish carpentry, and mechanical planning in one small area.
A tight loft has square corners, no bounce underfoot, flush guardrail attachment, a switched light at the bed, and an egress opening you can actually climb through. A weak loft flexes, creaks, and hides fasteners driven into drywall instead of blocking.
That single space tells me more than any brochure.
Loft Headroom, Ceiling Height & Volume Planning
Headroom decides whether a loft feels like a bedroom or a crawlspace. I plan it before I plan anything else in the upper volume.
Appendix AQ allows a loft ceiling height as low as three feet measured from the loft floor to the ceiling above, with a minimum horizontal loft area of 35 square feet and a minimum dimension of five feet in any direction. Those are floor limits, not comfort targets.
I aim higher whenever the overall height budget allows.
Minimum Headroom Benchmarks
Three feet lets an adult sit upright near the peak. Four feet lets most adults sit up anywhere under the ridge and change clothes without contortion.
Anything under 40 inches at the mattress edge creates daily friction. I measure from the top of the finished mattress, not the loft deck, because that is where a person’s head actually sits.
Roof Pitch and Usable Loft Volume
Roof geometry controls usable volume more than total height does. A steeper gable delivers real sitting room at the center, while a shed roof gives you one tall wall and one very short one.
A 12:12 gable on a 8.5-foot-wide tiny home produces a generous center ridge and tight edges. A 3:12 shed roof produces uniform mediocrity across the whole loft.
I pick the pitch based on where the bed sits and where a person’s head lands.
Sitting, Kneeling, and Standing Zones
I map three zones in every loft. A standing or near-standing strip at the access point, a sitting zone over the mattress, and a kneeling or storage zone at the low edges.
Storage belongs in the low zone. Mattresses belong in the sitting zone. Access belongs at the tallest point, because that is where people transition from vertical to horizontal.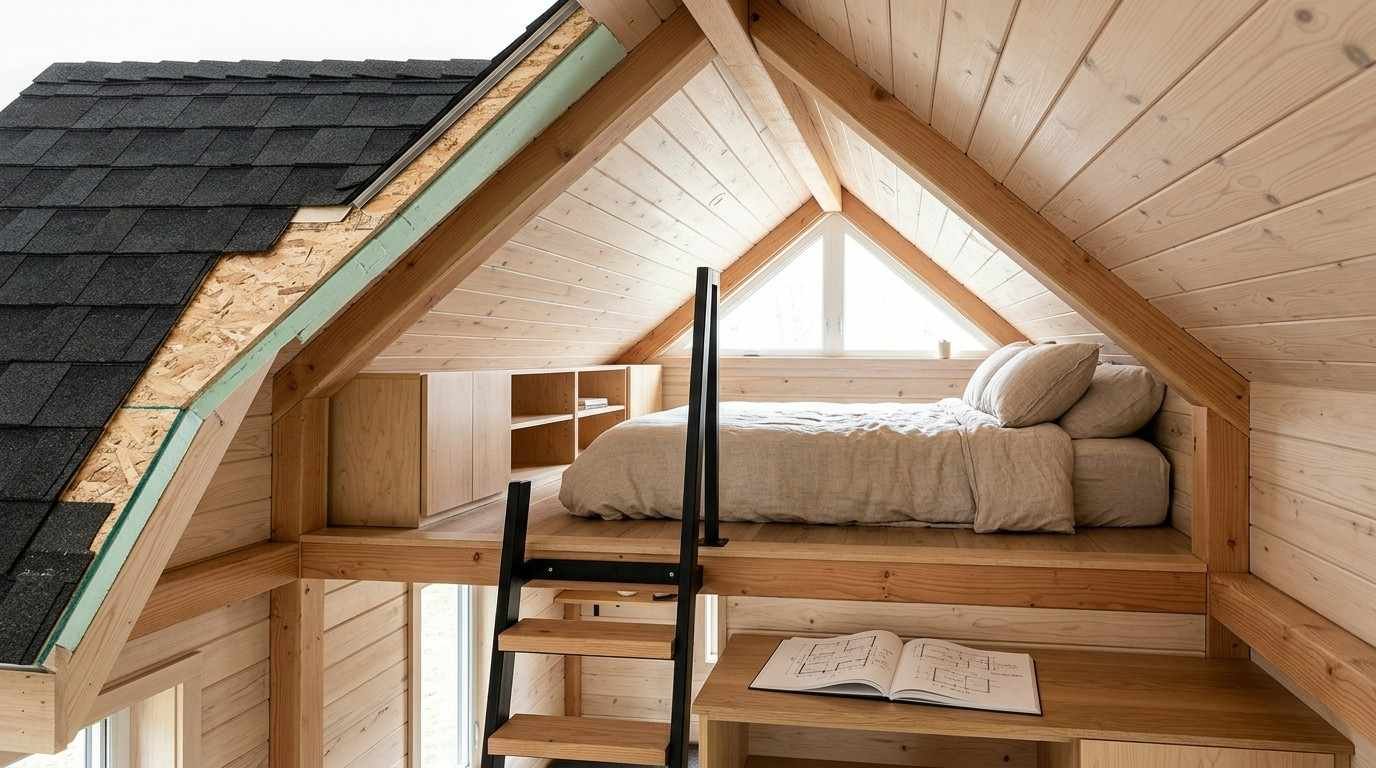
Structural Framing and Load Capacity of Sleeping Lofts
Loft framing carries people, mattresses, furniture, and stored belongings, all suspended off wall assemblies that are usually only 2×4 or 2×6. This is the part of loft design where shortcuts create genuine danger.
I size loft framing to the same standards I would use for a conventional floor, then add margin for the dynamic loads a tiny home experiences in transit.
Loft Joists, Spans, and Deflection
Loft joists span the width of the home, typically 8 to 8.5 feet in a road-legal build. I use 2×6 or 2×8 joists at 16 inches on center for that span, sized by species and grade rather than habit.
Deflection matters as much as strength. A loft that meets load requirements but flexes noticeably underfoot feels unsafe, and that perception drives buyers away from otherwise sound homes.
I test for bounce by walking the center of the loft during framing inspection. Any perceptible give means the span or spacing needs revision.
Ledger Attachment and Wall Connections
The connection between loft joists and the wall is the highest-risk detail in the entire assembly. Loads concentrate there, and failures there are catastrophic rather than gradual.
I attach loft ledgers directly to studs with structural screws or through-bolts, never to sheathing alone. Blocking between studs distributes the load across multiple framing members instead of one.
Joist hangers rated for the actual load complete the connection. I want visible, inspectable hardware rather than toe-nailed joints hidden behind finish.
Live Load and Dead Load Requirements
Appendix AQ permits a reduced live load of 30 pounds per square foot for tiny house lofts, compared with 40 psf for a standard sleeping room floor. Dead load accounts for the framing, decking, and finishes themselves.
I design for the full 40 psf anyway. The cost difference is small, and the margin covers the storage, guests, and furniture that lofts always accumulate.
Road-Travel Loads for Tiny Homes on Wheels
A tiny home on wheels experiences forces a foundation home never sees. Highway vibration, lateral sway, and sudden braking all transfer through the loft connections.
I add hurricane ties, structural sheathing panels, and continuous load paths from the loft down to the trailer frame. Static load calculations alone do not describe what happens at 60 miles per hour.
Weight distribution also matters. A heavy loft at the rear of a trailer changes tongue weight and towing behavior, so I coordinate loft placement with the tiny home trailer and foundation engineering before framing begins.
Loft Access: Stairs, Ladders, and Alternating Treads
Access is the loft decision homeowners regret most often. It affects daily comfort, safety, floor area, and resale appeal all at once.
I ask three questions before choosing. Who climbs this every night, how old will they be in ten years, and how much floor area can the home actually surrender?
Ladders vs. Stairs vs. Alternating Tread Devices
Ladders cost the least and consume almost no floor area. They also demand grip strength, balance, and both hands, which rules them out for many households.
Stairs are safest and most comfortable, and they cost the most in floor area. Alternating tread devices sit between the two, delivering a stair-like climb in roughly the footprint of a steep ladder.
I recommend stairs for anyone planning to age in the home, and alternating treads when floor area is genuinely unavailable.
Tread Depth, Riser Height, and Handrails
Appendix AQ allows tiny house stairs with treads as shallow as six inches and risers up to 12 inches, with a minimum stair width of 17 inches above the handrail. Those dimensions are far tighter than standard residential stairs.
Ladders under the same provisions need a minimum width of 12 inches, rungs spaced 10 to 14 inches apart, and an incline between 70 and 80 degrees. Handrails on at least one side are required for stairs.
I add a graspable handrail even where a ladder is used, because the transition at the top is where most falls happen.
Storage-Integrated Stair Systems
Good stair design gives the floor area back. Drawers under treads, a pantry in the stair volume, or a closet built into the stringer cavity all recover space the stairs consumed.
I build stair storage as part of the framing package rather than as an afterthought. Cabinet-grade drawer slides, full-extension hardware, and finished interiors turn a structural element into usable tiny home storage and space-saving design that buyers actually notice.
Guardrails, Fall Protection, and Edge Safety
A loft edge is a fall hazard measured in feet, and a fall from six or seven feet onto a hard floor causes real injury. Guardrails are not optional decoration.
I design guardrails as structural components anchored into loft framing, not as trim screwed to a subfloor edge.
Guardrail Height and Opening Limits
Appendix AQ requires guards along the open sides of lofts, with a minimum height of 36 inches or one half the clear height to the ceiling, whichever is less. Openings in the guard must not allow passage of a four-inch sphere.
I keep the four-inch rule in mind even for adult-only households. Resale brings children into the home eventually, and retrofitting a guardrail is far harder than building it correctly once.
Horizontal rails invite climbing. I use vertical balusters, cable with proper tension, or solid half walls instead.
Safety Considerations for Children and Older Adults
Children need higher guards, closer baluster spacing, and a gate at the access opening. I also position the mattress away from the open edge rather than against it.
Older adults need different accommodations. Stairs instead of ladders, a continuous handrail, brighter task lighting at the transition, and a main-floor sleeping alternative for the years ahead.
I build the loft for the household’s next decade, not just its first year.
Emergency Egress and Fire Safety in Sleeping Lofts
Fire moves upward, and a sleeping loft sits at the top of a very small volume. Egress from a loft is the most consequential safety requirement in the entire design.
I plan a second way out of every loft before I finalize the roof or window schedule.
Egress Window and Skylight Requirements
Appendix AQ requires an emergency escape and rescue opening in every loft used for sleeping, with a minimum net clear opening of five square feet and a minimum dimension of 22 inches. That is smaller than a standard bedroom egress window, but still sizable in a tiny home wall.
Skylights qualify when they meet the same opening dimensions and are operable from inside without tools. I prefer a gable-end window where geometry allows, because climbing out horizontally beats climbing out overhead.
Sill height matters too. An opening a person cannot reach from the mattress is not a functional escape route.
Smoke and Carbon Monoxide Alarm Placement
Smoke alarms belong inside the loft, not just on the main floor. Smoke reaches the loft ceiling first, which is exactly why the alarm needs to be there.
Carbon monoxide alarms go wherever fuel-burning appliances or attached garages exist. Propane heaters, cooktops, and water heaters all make CO detection mandatory rather than optional.
I interconnect the alarms so one triggers all.
Escape Path Planning From an Elevated Sleeping Area
I map the escape sequence out loud with every client. Wake, exit the mattress, reach the opening, open it, get out.
That sequence has to work in darkness and in smoke. Glow markers on the access edge, a graspable handrail, and an unobstructed path to the egress opening all shorten the time it takes.
I keep the loft floor clear of stored items along the escape route. Clutter in a three-foot-high space becomes an obstacle course under stress, which is why I coordinate loft egress with whole-home tiny home fire safety and emergency planning rather than treating it in isolation.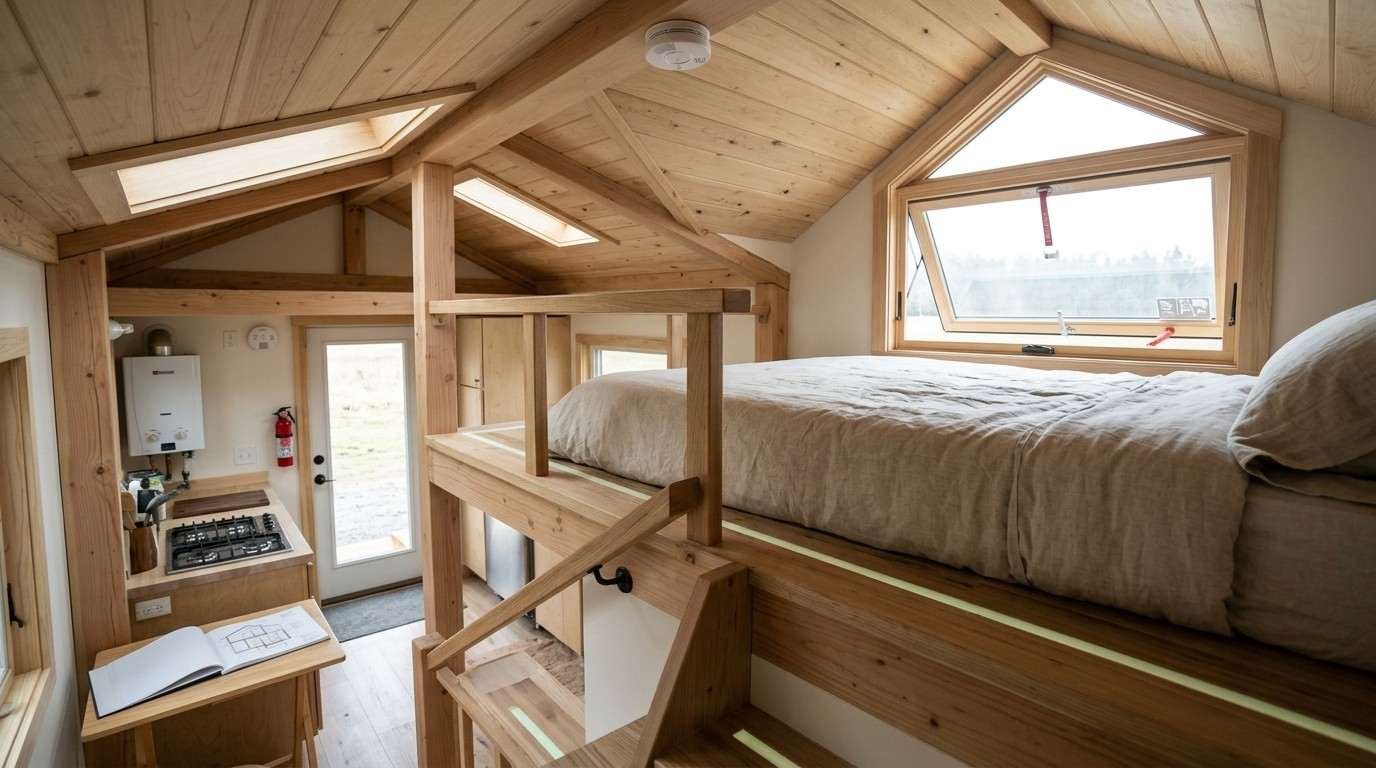
Ventilation, Temperature Control, and Air Quality
Heat collects at the top of every enclosed space, and a sleeping loft is the top of a very small one. Poor loft ventilation ruins sleep more reliably than any other design flaw.
I plan air movement through the loft with the same care I give the framing.
Heat Stratification in Loft Spaces
Warm air rises and pools against the loft ceiling. In a tiny home the temperature difference between floor level and loft peak reaches 10 to 15 degrees Fahrenheit on a warm California afternoon.
That gradient works in winter and fails badly in summer. I break the stratification with active air movement rather than hoping insulation alone solves it.
Fans, Mini-Splits, and Operable Openings
A quiet DC ceiling fan or a small reversible fan at the loft peak moves more comfort per watt than any other device. I mount it where blade clearance stays safe above a seated adult.
Mini-split head placement matters more than capacity. A head aimed at the loft opening conditions the upper volume, while a head tucked under the loft conditions only the floor.
Operable windows at both ends create cross ventilation. One opening moves almost nothing, and two openings on opposite walls move a lot, which is why I coordinate loft airflow with whole-home tiny home HVAC and energy efficiency planning.
Insulation, Moisture Control, and Condensation Management
The loft sits directly against the roof assembly, which makes it the most thermally exposed sleeping space in the home. It also collects the moisture two sleeping adults release overnight.
I treat the roof assembly and the loft interior as one connected system.
Roof Assembly Insulation Values
California’s Title 24 energy standards set prescriptive insulation requirements by climate zone, and roof assemblies carry the highest values in the home. Closed-cell spray foam, rigid board, or dense-packed batts each work when installed without gaps.
I care most about continuity. A single uninsulated framing bay above a mattress creates a cold surface that condenses moisture every night.
Vapor Control and Mattress Condensation
A mattress lying flat on a loft deck traps moisture underneath it. Body heat and respiration push humid air into the mattress, and the cool deck below condenses it into the foam.
I solve this with a slatted platform, a breathable underlay, or a ventilated mattress base that lets air pass beneath. Every one of those costs less than replacing a mold-damaged mattress.
Vapor control in the roof assembly matters just as much. Correct membrane placement for the climate zone keeps moisture out of the insulation itself, and getting it wrong turns a well-built tiny home insulation and moisture control assembly into a persistent maintenance problem.
Lighting, Electrical, and Comfort Details
Loft electrical work is easy to do adequately and hard to do well. The difference shows up every single night.
I run the loft circuits during rough-in, because retrofitting wiring into a finished three-foot-high space is genuinely miserable work.
Switching, Outlets, and Reading Light Placement
I put a three-way switch at the loft and at the base of the stairs. Nobody should climb a ladder in the dark or descend it to turn off a light.
Outlets belong at mattress height on the knee wall. Two duplex receptacles handle phones, a lamp, a CPAP, and a fan without extension cords running across the loft floor.
Reading lights mount at shoulder height beside each sleeping position. Warm color temperature, dimmable, and aimed downward keeps the loft usable when one person sleeps and the other reads.
Loft Storage and Built-In Furniture
Low-headroom edges are perfect storage volume. Drawers, cubbies, and shelves along the knee walls turn dead space into function.
I build storage in rather than adding freestanding furniture. Freestanding pieces slide during travel and block the egress path, and neither of those is acceptable in a sleeping loft.
California Codes, ANSI 119.5, and Permitting Context
Code compliance for sleeping lofts in California depends entirely on how the home is classified. Foundation-built, on wheels, or park model, each follows a different path.
I resolve classification first, because every dimensional requirement downstream flows from that answer.
Appendix AQ / Appendix AR Tiny House Provisions
California adopted tiny house provisions in the California Residential Code, drawn from the ICC framework. Those provisions cover loft ceiling height, loft area, guards, stairs, ladders, and emergency escape openings, all relaxed relative to standard residential requirements.
I treat the appendix as the governing dimensional reference for permitted, foundation-built tiny homes. It gives clear numbers, and inspectors recognize it.
The California Department of Housing and Community Development publishes guidance on how tiny homes are classified and regulated across the state. That guidance is the starting point for any permitting conversation.
Tiny Homes on Wheels vs. Foundation-Built Units
A foundation-built tiny home follows the California Residential Code, including the tiny house appendix. Permits, inspections, and a certificate of occupancy all apply.
A tiny home on wheels is regulated as an RV or park trailer, typically under the ANSI A119.5 park model RV standard rather than the residential code. Loft requirements shift accordingly, and RVIA certification becomes the quality benchmark.
I tell every client to settle this question before design starts. The classification determines the loft’s legal minimums, the insurance options, and where the home can legally be placed.
Local Jurisdiction Variation Across California
State code sets the floor, and local jurisdictions add their own layer. Fresno, Los Angeles, San Diego, and Placer County all handle tiny homes differently, with distinct rules on ADU status, movable tiny house ordinances, and permanent occupancy.
I check local ordinances during feasibility rather than after design. A loft that meets state code still fails if the jurisdiction limits sleeping areas above the main floor, and the practical details live in local tiny home building codes and permits in California rather than in state text alone.
How Do I Know Whether a Builder’s Loft Design Is Actually Safe?
That question separates marketing from craftsmanship. The answer lives in details you can see, touch, and ask about directly.
How to Evaluate a Builder’s Sleeping Loft Workmanship
I evaluate lofts the same way an inspector does, by looking at connections and measurements rather than finishes. Paint hides a lot, and hardware hides nothing.
A builder who welcomes this inspection is a builder worth hiring.
Inspection Points During a Walkthrough
I start by walking the center of the loft. No bounce, no creak, no perceptible deflection means the framing was sized correctly.
Then I check the guardrail by pushing on it firmly at the top rail. Movement there means the posts were fastened to sheathing instead of framing.
I open the egress window from the mattress position, measure the clear opening, test the loft light switch from below, and look for visible joist hangers at the ledger. Each of those takes seconds and reveals real quality, which is why I fold them into a broader home construction quality checklist before signing anything.
Questions to Ask Before Signing a Build Contract
I ask what live load the loft is designed for and get a number, not an adjective. I ask how the ledger attaches and expect a specific fastener and blocking description.
I ask which code or standard the loft complies with, whether the home carries RVIA or state approval, and what the egress opening dimensions are. I also ask to see a previous loft from the same builder in person.
Vague answers to specific questions tell me everything I need to know.
Sleeping Loft Costs, Value, and Long-Term Durability
A well-built loft is one of the cheapest square footage in a tiny home, because it uses volume that already exists under the roof. Framing, decking, guardrail, egress window, and finish typically run a fraction of adding floor area.
Stairs change that math. A storage stair system with cabinet-grade hardware costs several times what a ladder costs, and it delivers proportional resale and daily comfort value.
Durability comes from the connections. Properly fastened ledgers, hangers, and guardrail posts hold for decades, while under-fastened ones loosen year over year until the loft feels unsafe and the repair means opening finished walls.
Common Sleeping Loft Design Mistakes
The mistake I see most often is headroom measured to the deck instead of to the top of the mattress. That single error costs six to ten inches of real sitting room.
Second is an egress opening a person cannot reach or operate from bed. Third is a guardrail fastened to drywall and sheathing rather than framing, which feels solid on day one and loosens by year three.
I also see ladders chosen for households that will not tolerate them in five years, mini-split heads mounted where they never reach the loft, mattresses laid directly on solid decking, and single light fixtures with no switch at the top of the stairs. Every one of those is preventable at the design stage and expensive afterward.
Conclusion
I have walked you through loft definitions, headroom, framing loads, access systems, guardrails, egress, climate control, code classification, and builder evaluation.
Sleeping lofts sit at the intersection of structure, safety, and comfort, and the deeper cluster guides expand each dimension covered here.
We design and build safe, comfortable sleeping lofts across California. Talk to Tiny Home Builders California and get a loft that performs for decades.
Frequently Asked Questions
How much headroom does a tiny home sleeping loft need?
Code allows as little as three feet of loft ceiling height. I recommend at least four feet measured from the top of the mattress for comfortable daily use.
Are guardrails required on tiny home sleeping lofts?
Yes. Loft guards must reach 36 inches or half the clear ceiling height, whichever is less, and block passage of a four-inch sphere.
Does a sleeping loft need an egress window?
Every loft used for sleeping needs an emergency escape opening. The minimum net clear opening is five square feet with a 22-inch minimum dimension.
Are stairs or ladders better for a tiny home loft?
Stairs win on safety, comfort, and resale value. Ladders win on cost and floor area. I choose stairs for any household planning to age in place.
How much weight can a tiny home sleeping loft hold?
Tiny house lofts are commonly designed for 30 pounds per square foot of live load. I build to 40 psf to cover storage, guests, and furniture.
Why does my tiny home loft get so hot?
Warm air rises and pools at the loft ceiling. A peak-mounted fan, operable windows at both ends, and correct mini-split placement resolve most heat complaints.
Can two adults sleep comfortably in a tiny home loft?
Yes, with adequate headroom, a ventilated mattress base, cross ventilation, and outlets plus reading lights on both sides of the bed.